Running on a Raspberry Pi
Quite amazingly, this website comes to you directly from under my desk over a normal home broadband connection. This post will summarise my experience with the RaspberryPi as a webserver and will give you step-by-step instructions to easily setup your own RaspberryPi webserver.

Webserver
Read more about installing all the software needed to turn your Raspberry Pi into a webserver
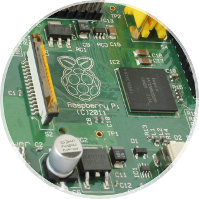
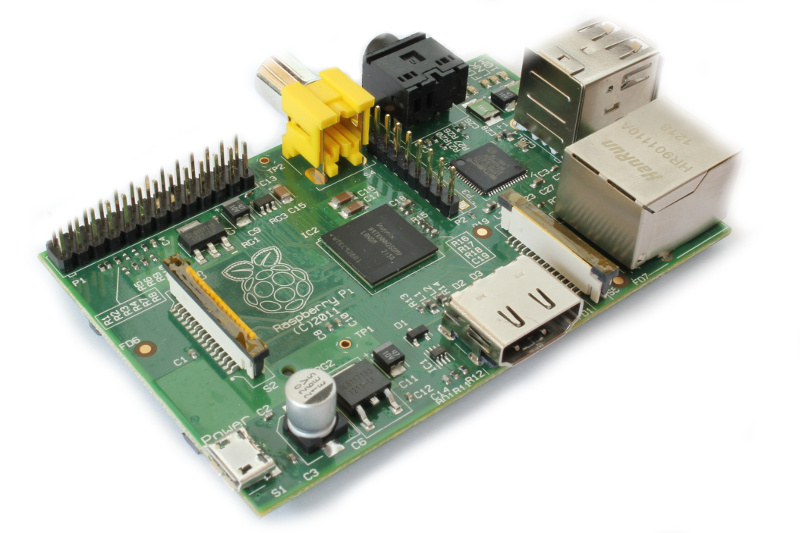
The Raspberry Pi a powerful little computer
The Raspberry Pi is a credit-card-sized computer board from the UK for just 35$. It is an ARM system on a chip with 512MB of RAM and a 700MHz CPU. This might doesn't sound like much but it proved much more powerful than expected. The newest firmware also allows dynamic over-clocking up to 1GHz.
What you need to get started:
- a Raspberry Pi for around 35$ check for retailer on http://www.raspberrypi.org
- one SD-card, preferably 16GB for around 15$ from Amazon
- USB mouse and keyboard
- one HDMI cable and a HDMI monitor or TV. If you have a VGA only monitor there are some cheap passive adaptors but there is absolutely no guaranty that it will work. The digital HDMI signal is much weaker than the analogue VGA signal and even with the shortest cable it only works for some monitors. Especially older ones won't detect any signal. Check your TV as it most likely has HDMI.
- an Ethernet cable or optional a USB wifi adaptor for around 10$. Any usb wifi adaptor should be fine.
- a 1 Amp micro USB power supply. I had an old phone charger laying around or you can buy them for 5$ online.
- a case for your Raspberry Pi
- a SD-card reader to prepare the SD-card for your Raspberry Pi
- optionally, you might want to buy 3 heat sinks which will keep your Raspberry Pi cool under load for around 5$. I can't say how relavent this is but I noticed the Pi getting hot under heavy duty. It's optional but won't hurt either.
The Raspberry Pi as small webserver Arch Linux, Nginx, PHP, mySQL, dynamic DNS
The next step will be to turn your Raspberry Pi into a webserver. After some playing around I decided to go with Arch Linux. It might be a distribution for more advanced users in general but I still recommend it for our scenario as it is lightweight and nicely documented. After the initial setup you will use your Raspberry Pi over ssh and that means you don't need any graphical desktop environment.
First steps will be to download the Arch Linux image and write it to your SD-card.
- download the Arch Linux image from http://www.raspberrypi.org/downloads and verify the checksum
- unzip the download
-
write the image file to your SD-card using the dd command
Important! This deletes existing data so be sure you know what you are doing! Make sure that you specify the correct USB flash drive!dd if=archlinux-hf-XXXX-XX-XX.img of=/dev/sdX
- extend the file system to use the full space on the SD-card: on any Linux distribution you can do that using the gparted programme.
The RAM of the Raspberry Pi is shared between CPU and GPU. As we won't use any graphical desktop we can allocate as much RAM as possible to our webserver.
Important! This could potentially damage your Pi. I use these settings myself but it comes with an overall exclusion of liability!
-
open the following file on the SD-card:
/boot/config.txt -
set the following line at the end of the configuration file
gpu_mem_512=64
cma_lwm=10
cma_hwm=25
cma_offline_start=16
-
enable the turbo mode for dynamic over-clocking by setting in the config file
##Turbo
arm_freq=1000
core_freq=500
sdram_freq=500
over_voltage=6
-
Open the following file on the SD-card:
/boot/cmdline.txtand make sure you have this set for the dynamic RAM allocationcoherent_pool=2M CMA=2M
Now you are all set-up for the first boot of your Raspberry Pi. Just insert the SD-card into the slot, connect all peripherals and connect the power supply. The small LED should show that the Raspberry Pi is active and you will boot to command line of Arch Linux. If you're new to Arch Linux have a look around in their wiki. Next steps will install necessary software such as the Nginx webserver, PHP, MySQL etc...
-
first you should set a strong password for root with
passwd
-
Next we have to get the internet running. If you use a wired connection it should just work using
dhcp. If you require a manual network configuration have a look at the wiki for detailed instructions. When using Wifi you have to do some additional legwork.-
install netcfg
pacman -S netcfg -
copy the example configuration file for WPA
cp /etc/network.d/examples/wireless-wpa /etc/network.d/mywifi -
edit the profile with your wifi details
nano /etc/network.d/wifi -
enable the profile
systemctl enable netcfg@mywifi -
start the wifi with
netcfg mywifi - check the wiki for more details
-
install netcfg
-
make a full update of the software
pacman -Syu
-
install ssh
pacman -S opensshand configure your ssh daemon for better security in/etc/ssh/sshd_config. Especially, you should set the port from 22 to any higher port. For highest security use public keys for login. You find the details on the wiki. -
to get the time start the ntpd daemon
systemctl start ntpdand enable it at startupsystemctl enable ntpdcheck the wiki for more details -
install the Nginx webserver
pacman -S nginx. If you consider the security threat to your webserver as small than there is no need to install the webserver in a chroot environment. Otherwise have a look at the wiki. Start the webserversystemctl start nginxand enable it on startupsystemctl enable nginx -
install PHP
pacman -Ss php-and php-fpmpacman -S php-fpmand start and enable itsystemctl start php-fpm,systemctl enable php-fpm. To enable php extensions have a look at the configuration file/etc/php/php.ini. Read the PHP section in the wiki to make it work with Nginx. This depends on where you will place your web applications. -
install MySQL
pacman -S mariadb libmariadbclient mariadb-clients
systemctl start mysqld
mysql_secure_installation
systemctl restart mysqld
systemctl enable mysqld
to minimise the memory usage of mysqld you might want to copy the standard configuration file for small systemscp /usr/share/mysql/my-small.cnf /etc/mysql/my.cnf
-
for dynamic DNS install the ddclient
pacman -S ddclientand enable itsystemctl enable ddclient. The configuration file is/etc/ddclient/ddclient.conf. I am running several domains from namecheap on my webserver and I had problems using ddclient to update multiple domains. This seems to be a common problem and I found a patch here which fixed the problem for me.--- ddclient 2012-08-22 18:49:15.643067531 -0500 +++ ddclient 2012-08-22 20:32:23.671069165 -0500 @@ -3375,8 +3375,11 @@ my $url; $url = "http://$config{$h}{'server'}/update"; - $url .= "?host=$h"; - $url .= "&domain=$config{$h}{'login'}"; + my $domain = $config{$h}{'login'}; + my $host = $h; + $host =~ s/(.*)\.$domain(.*)/$1$2/; + $url .= "?host=$host"; + $url .= "&domain=$domain"; $url .= "&password=$config{$h}{'password'}"; $url .= "&ip="; $url .= $ip if $ip;After you have used the patch you have to use the full URLs in the ddclient.conf file to update your domains. Again read the full details here
A lightweight CMS for your Raspberry Pi webserver GetSimple CMS and Bootstrap
I was looking for a lightweight CMS to use on my Raspberry Pi webserver. I wanted something really fast which can also handle high amounts of traffic. As the Pi has only limited RAM and muscle power I was looking for alternatives to the MySQL based CMS. This website is using GetSimple CMS with some Bootstrap for the design. I would say that GetSimple CMS is the best match for the Pi when you look for speed. The CMS is written in PHP and based on flat XML files for data storage. It is also highly flexible and easy to theme or extend with plugins.

To use GetSimple CMS with the Nginx webserver you have to make changes to the configuration file /etc/nginx/nginx.conf.
Important! This configuration comes without any liability!
worker_processes  1;
error_log  /var/log/nginx/error.log  info;
events {
    worker_connections  1024;
}
http {
    include       mime.types;
    default_type  application/octet-stream;
    server_names_hash_bucket_size  64;
    log_format  main  '$remote_addr - $remote_user [$time_local] "$request" '
                      '$status $body_bytes_sent "$http_referer" '
                      '"$http_user_agent" "$http_x_forwarded_for"';

    access_log  /var/log/nginx/access.log  main;
    sendfile        on;
    keepalive_timeout  65;
    index       index.htm index.html;
    fastcgi_cache_path  /var/cache/nginx  levels=1:2 keys_zone=GETSIMPLE:10m inactive=15m;
    map $http_cookie $logged_in {
      default 0;
      ~GS_ADMIN_USERNAME 1;
    }

    server {
        listen          80;
        index           index.php;
        charset         utf-8;
        location / {
                 rewrite        /?([A-Za-z0-9_-]+)/?$ $1 break;
                 try_files      $uri $uri/ /index.php?id=$uri&$args;
                 fastcgi_cache_bypass      $logged_in;
                 fastcgi_no_cache          $logged_in;
                 }
        location ~* /admin/.*\.php$ {
                 include         fastcgi.conf;
                 fastcgi_param   SCRIPT_FILENAME    $document_root$fastcgi_script_name;
                 fastcgi_param   SCRIPT_NAME        $fastcgi_script_name;
                 fastcgi_param   QUERY_STRING       $query_string;
                 fastcgi_param   REQUEST_METHOD     $request_method;
                 fastcgi_param   CONTENT_TYPE       $content_type;
                 try_files $uri /admin/index.php?id=$uri&$args;
                 fastcgi_index index.php;
                 fastcgi_pass unix:/run/php-fpm/php-fpm.sock;
                 }
        location ~* \.php$ {
                 include         fastcgi.conf;
                 fastcgi_cache_bypass $logged_in;
                 fastcgi_no_cache     $logged_in;
                 fastcgi_param        SCRIPT_FILENAME    $document_root$fastcgi_script_name;
                 fastcgi_param        SCRIPT_NAME        $fastcgi_script_name;
                 try_files            $uri =404;
                 fastcgi_index        index.php;
                 fastcgi_pass         unix:/run/php-fpm/php-fpm.sock;
                 expires 2h;
                 }
        location ~* \.(?:ico|js|gif|jpg|png)$ {
            expires 14d;
            }
        location ~* \.(htm|css|html)$ {
            expires 2d;
            }
        location ~* \.xml$           { deny all; }
        location = /sitemap.xml { allow all; }
        location ~ /\.          { deny all; }
        location ^~ /uploads/ {
                 if ($request_uri ~* \.php$) {return 403;}
                 }
        }
}
This configuration allows subpage structures using a simple rewrite rule in the root location part. To access the admin interface of the cms go to /admin/index.php.
Using Bootstrap with GetSimple CMS
In order to use Bootstrap with the GetSimple CMS you could use one of the available Bootstrap themes from here or you just hack it together yourself.
-
add the Bootstrap css to the theme. To reduce the load on your Pi use a hosted version of Bootstrap. Add to the following to the file
/theme/yourtheme/header.inc.php<meta content="width=device-width" name="viewport"> <link href="http://netdna.bootstrapcdn.com/twitter-bootstrap/2.3.1/css/bootstrap-combined.min.css" rel="stylesheet">
-
Add to the file
footer.inc.php<script type="text/javascript"> if(typeof jQuery == 'undefined') { document.write("<script type=\"text/javascript\" src=\"http://ajax.googleapis.com/ajax/libs/jquery/1.8.2/jquery.min.js\"> </"+"script>"); var __noconflict = true; } </script> <script src="http://netdna.bootstrapcdn.com/twitter-bootstrap/2.3.1/js/bootstrap.min.js"> </script>
Bootstrap Navigation Bar
I wrote a small plugin to generate the code for the Bootstrap Navbar. It supports a single level of child pages.
Important! I quickly hacked this together and the plugin comes with no liability!
<?php

// get correct id for plugin
$thisfile = basename(__FILE__, '.php');

// register plugin
register_plugin(
        $thisfile,      // ID of plugin, should be filename minus php
        'Bootstrap Menu',       # Title of plugin
        '1',    // Version of plugin
        'Jan Teichmann',        // Author of plugin
        'http://www.janteichmann.me',   // Author URL
        'Creates a Bootstrap ready menu structure with submenus for child pages',       // Plugin Description
        'template',     // Page type of plugin
        'bs_menu'       // Function that displays content
);


add_action('changedata-save','clear_menu_cache');

function clear_menu_cache()
{
        $cachepath = GSDATAOTHERPATH.'bs_menu_cache/';
        if (is_dir($cachepath))
        {
                $dir_handle = @opendir($cachepath) or exit('Unable to open data/other/bs_menu_cache folder');
                $filenames = array();

                while ($filename = readdir($dir_handle))
                {
                        $filenames[] = $filename;
                }

                if (count($filenames) != 0)
                {
                        foreach ($filenames as $file)
                        {
                                if (!($file == '.' || $file == '..' || is_dir($cachepath.$file) || $file == '.htaccess'))
{
                                        unlink($cachepath.$file) or exit('Unable to clear data/other/bs_menu_cache folder');
                                }
                        }
                }
        }
}


function bs_menu()
{
        $active_page=return_page_slug();
        $cachepath = GSDATAOTHERPATH.'bs_menu_cache/'.$active_page.'.cache';

        if (is_file($cachepath)) //use cached file
        {
                echo file_get_contents($cachepath);
        }

        else //create new cache file
        {
                $active_parent=return_parent();
                if (strlen($active_parent)==0)
                {
                        $active_parent=return_page_slug();
                }
                else
                {
                        $higher_parent=trim(returnPageField($active_page, 'parent'));
                        while ($higher_parent!=''){
                                $active_parent=$higher_parent;
                                $higher_parent=trim(returnPageField($active_parent, 'parent'));
                        }
                }

                $gs_menu_data=menu_data();
                $bs_menu_data=array();


                if (count($gs_menu_data) != 0)
                {
                        //Loop through all menu entries
  foreach ($gs_menu_data as $entry)
                        {
                                if (!$entry["private"]=='Y' & $entry["menu_status"]=='Y')
                                {
                                        if ($entry["parent_slug"])
                                        {
                                                if (array_key_exists($entry["parent_slug"], $bs_menu_data))
                                                {
                                                        $bs_menu_data[$entry["parent_slug"]]["children"][] = $entry;
                                                }
                                                else
                                                {
                                                        $bs_menu_data[$entry["parent_slug"]] = array();
                                                        $bs_menu_data[$entry["parent_slug"]]["children"] = array();
                                                        $bs_menu_data[$entry["parent_slug"]]["children"][] = $entry;
                                                }
                                        }
                                        else
                                        {
                                                if (!array_key_exists($entry["slug"],$bs_menu_data))
                                                {
 {
                                                        $bs_menu_data[$entry["slug"]]=array();
                                                }
                                                $bs_menu_data[$entry["slug"]] = array_merge ($bs_menu_data[$entry["slug"]], $entry);
                                        }
                                }
                        }
                }

                $priority = array();
                foreach ($bs_menu_data as $key => $row)
                {
                    $priority[$key] = $row["menu_priority"];
                }
                array_multisort($priority, SORT_ASC, $bs_menu_data);


                // write menu string
                $menu_string = '';

                foreach ($bs_menu_data as $entry)
                {
                {
                        $li = '<li class="';
                        $a = '<a ';
                        if ($entry["slug"]==$active_parent) {
                                $li = $li.'active ';}
                        if (array_key_exists("children",$entry)) {
                                $li = $li.'dropdown">';
                                $a = $a.'class="dropdown-toggle" data-toggle="dropdown" ';
                                $a = $a.'href="#">'.$entry["menu_text"].' <b class="caret"></b></a>';
                                $menu_string = $menu_string.$li;
                                $menu_string = $menu_string.$a;
                                $menu_string = $menu_string.'<ul class="dropdown-menu">';
                                $menu_string = $menu_string.'<li> <a href="'.$entry["url"].'">'.$entry["menu_text"].'</a> </li>';
                                $menu_string = $menu_string.'<li class="divider"></li>';
                                foreach ($entry["children"] as $child)
                                {
                                        $menu_string = $menu_string.'<li> <a href="'.$child["url"].'">'.$child["menu_text"].'</a> </li>';
                                }
                                $menu_string = $menu_string.'</ul>';
                                $menu_string = $menu_string.'</li>';
                        }
                        else
                        {
                                $li = $li.'">';
                                $menu_string = $menu_string.$li;
                                $menu_string = $menu_string.$a.'href="'.$entry["url"].'">'.$entry["menu_text"].'</a> </li>';
                        }
                }


                // echo menu string
                echo $menu_string;

                // write cache
                //Check if cache folder exists.
                if (is_dir(GSDATAOTHERPATH.'bs_menu_cache')==false)
                {
                        mkdir(GSDATAOTHERPATH.'bs_menu_cache', 0755) or exit('Unable to create folder data/other/bs_menu_cache');
                }

                //Save cached child menu file.
                $fp = @fopen($cachepath, 'w') or exit('Unable to save data/other/bs_menu_cache/'.$active_page);
                fwrite($fp, $menu_string);
 fclose($fp);
        }
}

?>
to use the plugin to generate the Navbar create the following file /theme/yourtheme/ navigation.inc.php and add
<div class="navbar navbar-fixed-top navbar-inverse">
      <div class="navbar-inner">
        <div class="container">
          <a class="btn btn-navbar" data-toggle="collapse" data-target=".nav-collapse">
            <span class="icon-bar"></span>
            <span class="icon-bar"></span>
            <span class="icon-bar"></span>
          </a>
          <a class="brand" href="<!--?php get_site_url(); ?>"><?php get_site_name(); ?></a>
          <div class="nav-collapse collapse">
            <ul class="nav">
              <?php bs_menu(); ?>
            </ul>
          </div>
        </div>
    </div>
</div>
Performance and Summary
The Raspberry Pi can't host super dynamic websites with enormous traffic and this doesn't come by surprise. But the Pi turns out to be extremely capable and more than enough for most private websites and blogs. Especially the combination with GetSimple CMS handles high traffic easily. The load time of my website is between 1 and 2 seconds which is mainly for the Wifi connection. The webserver handles without problems 50 active concurrent clients and the only limit will be the bandwidth of my internet connection.
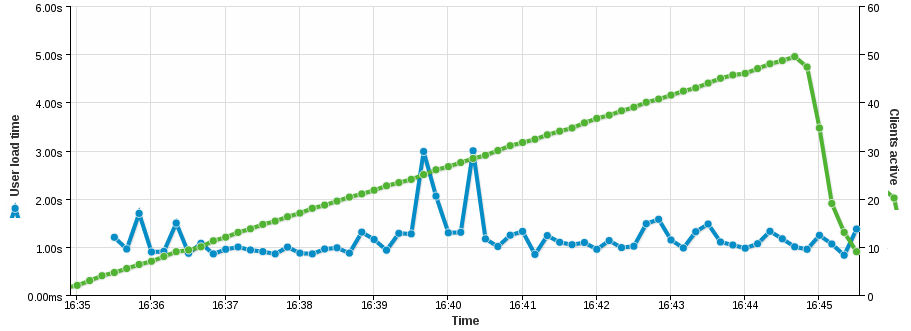
It looks different when your website uses MySQL excessively. As an example I have Piwik running on the same Raspberry Pi and the experience is not smooth with long page load times of around 5 seconds for complicated reports with many widgets.
To summarize, the Raspberry Pi is an ideal small webserver for mostly static websites or small load. In combination with GetSimple CMS, Nginx and PHP-fpm your website almost flies and the only limit is your bandwidth. The Pi uses around 3 Watts only. I had a hosting package before and I was tired of paying around 100$ every year for a bad performing shared server with outdated PHP and awful support. The Raspberry Pi allows you to host your own website at home at an extremely low price tag. And you have full access to experiment around. In my opinion, everyone should have a Raspberry Pi at home - the possibilities are endless!
Want to run Wordpress on a RaspberryPi with Niginx and Caching? Read how to setup Wordpress on a RaspberryPi.